Table of Contents
Introduction
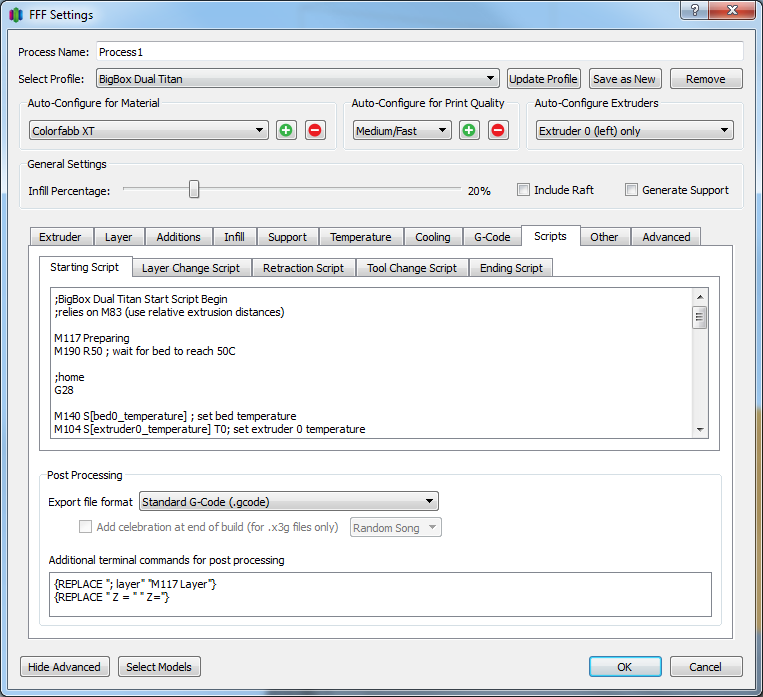
The scripts tab is a really powerful tool in the FFF settings window. This allows you to set Starting Scripts, set G-Code for every Tool Change, set G-Code for every Layer Change and set G-Code for the end of your print!
If you're intimidated by G-Code, it's actually a lot easier than it looks, a great way of learning and testing is to use the Communications tab over USB connection and send your printer a line of G-Code at a time to see the responses. One thing to keep in mind is that different printers will accept different commands to accomplish the same task. This is just something you should keep in mind if your wondering why a certain G-Code command does not work with your printer.
Basics of G-Code
G-Code is read line by line, the printer will accomplish one line of G-Code, then move on to the next. Always capitalize the letters in G-Code, spacing is important, and anything that comes after a semi-colon will not be read on that line. The two lines below are for home-all, and then move to 100, 100, 100 at a certain speed. The printer will home all 3 axis, then once that is done, move to the next line of G-Code.
G28; home all axis
G1 X100 Y100 Z100 F3600; Move to X100, Y100, Z100 at 3600 mm/min
(G-Code is natively in mm/min)
The link below is extremely useful, a glossary of G-Code commands for RepRap style printers
http://reprap.org/wiki/G-code
Scripts tab
Starting G-Code
This is the G-Code that will be ran after heating up but before your print. Traditionally, this will consist of homing the printer, potentially purging the nozzle, wiping the nozzle and running an auto-leveling function if the printer supports it. In addition, you can add PID values, or set toolhead offsets here if you'd like to.
If you're not a fan of the fact that Simplify3D heats up the bed/extruder, than runs your starting-script, you can customize this, by using the commands below. If you have the commands for [bed#_temperature] or [extruder#_temperature] in your starting G-Code script, the software won't add in heating commands, it will just run off of the commands in your starting script.
[fan_speed_percentage]
[fan_speed_pwm] - for example, M106 S[fan_speed_pwm]
[extruder0_temperature] - for example, M104 S[extruder0_temperature] T0; this will take the layer 1 temperature for extruder 0
[extruder1_temperature]
...
[bed0_temperature] - for example, M140 S[bed0_temperature] T0; this will take the layer 1 temperature for bed 0
[bed1_temperature]
...
Layer Change G-Code
I personally haven't had to use this, but I'm sure that there are some excellent reasons/ideas to use for this. If you'd like for a G-Code script to be inserted in-between each layer, than you can simply place it in this tab. One interesting use of this, is for the FlashForge Dreamer, to have the lights blink in between each layer, however that can be a bit too much at times! The placeholders that are available for this tab are below:
[previous_Z_position]
[current_Z_position]
Tool Change G-Code
This tab will insert G-Code on tool change commands. These commands can help do a ton of things for multiple extruder prints, especially if using the IF command functionality. For instance, if you wanted to change the temperature of your extruders (T0, and T1) for each tool change switch:
G28 X0 Y0; homes X-Y axis
{IF NEWTOOL=0}M104 S165 T1; set T1, inactive extruder to 165 C
{IF NEWTOOL=0}M109 S220 T0; Set T0, new active extruder to 220 and wait for it to reach temperature before proceeding.
{IF NEWTOOL=1}M109 S220 T1; set T1, Heat T1 to 220
{IF NEWTOOL=1}M104 S165 T0; Cool T0 to 165
If you were using one process (printed part with one extruder, support with the other), you would only need this script in your one process. However, if using multiple processes, you would need to copy+paste this into each process.
{IF OLDTOOL=0}G1 E-10 F1800 - this will only include the line that follows the {IF} brackets if the old tool (the one that was active prior to the tool change) is tool 0. You could use scripts like this to have different tool change retract distances for different tools
{IF NEWTOOL=0}G1 E10 F1800 - similar to the above command, however it checks the new tool (the one that will be active after the tool change)
[old_tool]
[new_tool]
[current_Z_position]
Ending G-Code
Usually the Ending G-Code's purpose will be to get the nozzle off of the part and then turn off the heaters/motors. The Ending G-Code below is taken from the RoBo 3D profile:
M104 S0 ; turn off extruder
M140 S0 ; turn off bed
G28 X0 ; home X axis
M84 ; disable motors
The placeholders available for the Ending G-Code:
[current_Z_position]
Post Processing
Create X3G file for MakerBot printers using GPX plugin
This is enabled for all of the MakerBot(Not 5th Gen MakerBot)/Sailfish style printers. The conversion will take your Machine Profile from the X3G tab of the Firmware Configuration and use that to convert your G-Code file to X3G. When you click Save Toolpaths to disk after slicing, the X3G file is automatically created when you save a .Gcode file.
Add Celebration to end of build
Add song to end of build, using Random always keeps things new when printing ![]()
Create .MakerBot file for 5th generation printers
Converts the G-Code file into .MakerBot file. Similar to the X3G, when you click Save Toolpaths to disk after slicing, the .MakerBot file is automatically created when you save a .Gcode file.
Additional Terminal Commands for Post Processing
If you are using a custom GPX ini file, this a very important section, as you will need to reference GPX in this section rather than use the built-in functionality. There's also a ton of post-processing commands below that help for those who are working with custom firmwares, or doing projects with their printers that require more functionality.
Using the Post Processing box would be if using a MakerBot/Sailfish style printer that doesn't have traditional steps-per-mm values, you would need to do the following:
- Use the Machine ini example to set a text document ini with your machine information: https://github.com/whpthomas/GPX/blob/master/examples/example-machine.ini
- Save the file as GPX.ini, place it in the Simplify3D installation folder
- Place the following in the post-processing box: GPX [output_filepath]
Below are the post-processing tools that also work in the post-processing box:
{REPLACE "E" "A"} - search and replace for the text within quotes, in this example every "E" character would be replaced with an "A" character
{PREPEND "G92 E0\n"} - prepends the specified text at the very beginning of the gcode file, note that the \n is converted into a true newline character, not two separate "\" and "n" characters
{APPEND "G28 X0 Y0\n"} - appends the specified text to the very end of the gcode file
{DELETE "M82\n"} - deletes every occurrence of the specified text from the gcode file, note that it will not automatically delete a line if it is suddenly empty after the deletion, so that is why you might want to include the \n at the end (so that the empty line is also removed)
{STRIP ";"} - completely deletes every line in the gcode file that begins with the specified text
{TOOL0REPLACE "E" "A"} and {TOOL1REPLACE "E" "B"} - these special TOOL#REPLACE commands will do a search and replace, very similar to the {REPLACE} command, however, the replace only occurs if the specified tool is active. For example, when using TOOL1REPLACE, the replacement will only occur if tool 1 was currently active at that line of the gcode file