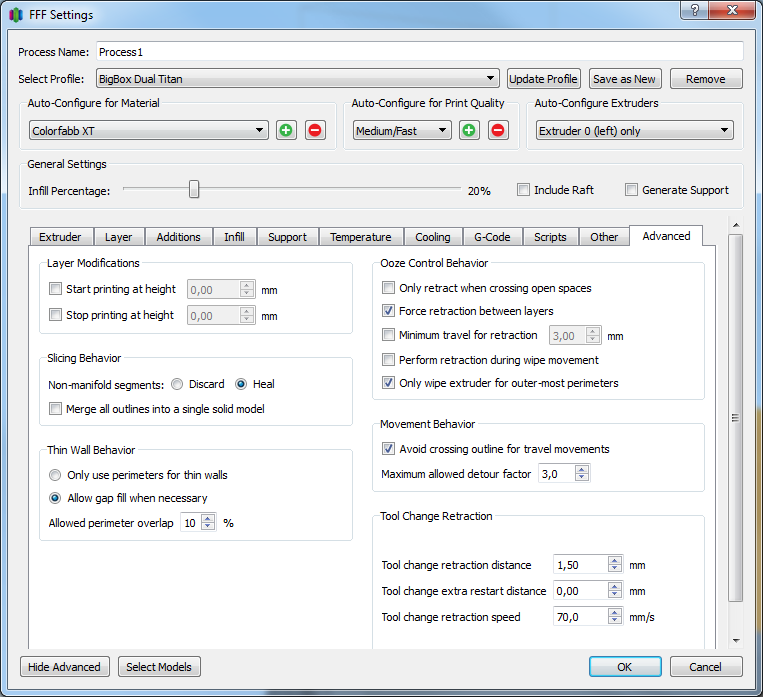
Layer Modifications Section
Start Printing at Height: All models in this process will start printing at ___ Height (mm)
Stop Printing at Height: All models in this process will stop printing at ___ Height (mm)
These two options are used primarily if you want to print with different settings in one part. For instance, if printing the Statue of Liberty below, you may want to print the base of the statue at a much thicker layer height then the statue itself.
Two Process Statue of Liberty Example:
The first process would stop at 50 mm (assuming 50 mm is where the base ends) and the second process would have a starting point of 50 mm so that the second process print settings would be applied to everything after 50 mm.
http://www.simplify3d.com/support/tutorials/different-settings-for-different-regions-of-a-model/- Tutorial on printing different settings for different regions
Slicing Behavior
Non-manifold segments: Non-Manifold segments are errors in the mesh. These are relatively common, the best behavior traditionally is to use Heal to attempt to patch up these missing areas. I personally have not needed to use the Discard option.
Merge all outlines into a single solid model:This feature in the software will slice the model taking all of the outer most perimeter outlines and slice with those assuming a solid model as the interior. For instance, if you had a model that was a block with screw-holes in it, but had "Merge all outlines into a single solid model" on, the holes would not show up. Using Merge all outlines is generally really useful for models that have errors in the mesh or if using Vase Mode.
Thin Wall Behavior
Only use perimeters for thin walls: If printing a very thin wall, this means that the software will not add in Infill into a very small crevices. If there's room to fit multiple perimeters, it will print in multiple perimeters, but otherwise you'd be left with a small gap.
Allow gap fill when necessary: This setting will work to add in another perimeter by allowing as long as it's within the overlap setting. Otherwise, it will fill the area with Infill.
Ooze Control Behavior:
Only retract when crossing open spaces: This is enabled by default for most profiles, since you really only need to do a retraction if you are crossing over an open space, since you would be crossing perimeters and be at risk for stringing.
Force retraction between layers: Forces a retraction from layer to layer. This is recommended.
Minimum travel for retraction: If a movement is below this threshold, it won't retract for that movement. This would be if your printer has a lot of problems with retractions, you may need to tweak this, to limit the number of retractions your print has.
Extruder ooze rate: The features tool-tip states this is an experimental option, so I personally have not experimented much with it. However, the idea would be to heat up your extruder, prime it, then wipe the filament away and measure how many mm's of filament will slowly extrude out of the nozzle over a minute, then using that data you would set that in your Extruder ooze rate setting.
Only wipe extruder for outer-most perimeters: This will ensure that you only use the Wipe feature (Extruder tab) when needed, when it would effect the appearance of your model. Therefore, to save time and be efficient it will only wipe the extruder for outer-most perimeters. It may not be helpful to wipe the extruder after doing Infill, however if you wanted the extruder to wipe after Infill you could do that by unchecking this box.
Tool Change Retraction:
Tool change retraction distance: When changing tools, a retract of __ mm will occur. The idea is that instead of a standard small retract, you can retract the filament far up the extruder to prevent any oozing while the other tool is printing.
Tool change extra restart distance: When priming the extruder that was previously retracted, this extra restart distance will be added to that value. For instance, if you have a tool change retraction of 12 mm, and an extra restart of -.5 mm, the following will occur:
Print with Right extruder
Tool Change Retract Right Extruder (12 mm)
Prime Left Extruder (12 mm + (-.5 mm))= 11.5 mm prime
Print with Left Extruder
Tool change retraction speed: The speed at which the retraction and primes will occur for the tool change retract/primes. I've found since you are moving much more filament, moving slower is very important. Trying to retract 12 mm of filament at F4800 may cause a lot of skipping which leads to other issues.