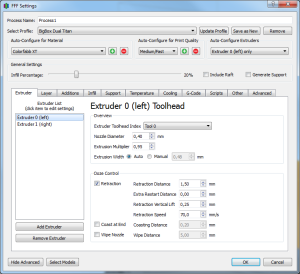
Overview Section
Extruder Toolhead Index
This is the Identifier your associated with your extruder head that is decided in your firmware. The general convention is your first tool will be T0, if you have multiple extruders general convention also is that T0 will be the right extruder and T1 will be the left extruder.
Nozzle Diameter
This is the diameter of the tip of your nozzle where plastic is extruded from. Traditional values range from .3 mm all the way up to 1 mm for some of the more customized printers. A smaller nozzle is great for thin walls, for printing small miniatures and other things that require fine precise details. Large 1 mm nozzles are great for rapid prototyping, creating large parts quickly and efficiently by pushing out lots of plastic.
Extrusion Multiplier
The extrusion multiplier will multiply the amount of filament extruded for your entire print. This includes skirts, rafts, supports, perimeter and infill extrudes. The default values in the software are .90 for PLA and 1.0 for ABS. If you notice that your Top solid layers are not as filled-in as you'd like them to be, I would recommend increasing the # of top solid layers, and if you still think there's an issue then this is the setting I'd recommend changing.
Extrusion Width
The slicing engine doesn't use your nozzle diameter, but instead uses your Extrusion Width setting. For most cases, keeping this setting on Auto (1.2x your nozzle diameter) is the best route, however for certain cases where you have extremely thin nozzles, you may find it's best to go to Manual and play with lowering the Extrusion Width setting.
Ooze Control
Retraction Distance
How much filament will be retracted when the software does a retract. For standard Direct Drive, usually .5 to 2.5 mm will work well. For Bowden extruders, 5 to 8.5 mm seems to work well.
Extra Restart Distance
When the software does a prime (after retracting), it will prime the same amount as retracted. However, you can modify this by placing an Extra Restart Distance, if you notice that your prints have minor blobs at the starting points, you may find that placing a small negative Extra Restart Distance can help, such as -.2 mm.
Retraction Vertical Lift
The nozzle will move up in the Z-axis whenever you do a retract. This is particularly helpful with Delta printers and prints that have a lot of islands, since the delta printers can be prone to running into parts when doing rapids.
Retraction Speed
The speed at which the filament will be retracted/primed. I think 1800 mm/min or 30 mm/sec is about as slow as I'd want to go for standard retracts, that going quicker will help for print quality in most cases.
Coasting Distance
Setting a coasting value can be good if you want to empty out your nozzle before doing a retract. Lets say you're printing a single line that is 100 mm long. If you set a coasting distance of 5 mm, the extruder will be pushing out plastic for the first 95 mm of traveling, but then stop extruding and while it will move over the rest of the line, it will not actually extrude anything for the last 5 mm. It will instead depend on the filaments momentum, and gravity to let the rest of the filament ooze out and fill in the region for the last 5 mm of the line.
Wipe Distance
Wiping happens after you've printed your outer most outline (Advanced tab, there's an option that's usually enabled for this). When you print your outer most outline, when it's time to do a retract, there's a good chance that not all of the filament in the extruder nozzle head is going to rise up, that a blob of molten liquid plastic is going to be at the tip of the nozzle still. For this reason, instead of rapidly moving to the next spot right away, you can use the Wipe function, which will wipe over the perimeter and let that filament ooze out, similar to Coasting. However, Coasting is not extruding over areas that need filament (you risk under-extrusion voids if coasting value is too high), Wiping is extruding over areas that have already been printed on(much lower risk of part quality being negatively effected).
There's a lot of terms in there, but here's the order they go in for an outer perimeter:
- Coasting starts __ mm before outer most perimeter is done
- Finishing printing outer most perimeter
- Retract __ mm at ____ Retraction Speed
- Wipe __ mm over the outer most perimeter
- Vertical lift up __ mm
- Rapid move at Rapid Move Speed (Other Tab)
- Vertical lift down __ mm
- Prime filament. Amount primed is Retraction Distance + Extra Restart Distance